# [Mac] nasneにコマンドラインから接続
Macを再起動するとMacが自動的にnasneを見つけて接続してくれるのだけど、見つけてくれるまで結構時間が掛かるのでこちらから繋ぎにいこう、というお話。
前提: nasne底面に貼ってあるシールに記載されたファイルサーバー名(nasne-xxxxxx)を控えておく(ルータでIPアドレスを固定で割り振っているならそちらでもOK)。ここでは「nasne-000000」とする。
GUIで行う
Finderメニューの移動>サーバへ接続を選択。
smb://nasne-000000 (もしくはsmb://(nasneに割り振ったIPアドレス))を入力し接続ボタン押下。
ユーザの種類にゲストを選択し接続ボタン押下。
マウントするボリュームをShare1としてOKボタン押下。
コマンドラインから行う
Macのファイルシステム上にnasneをマウントする為のフォルダを作成する。ここでは ~/test/nasne というフォルダとする。
$ mkdir -p ~/test/nasne
Terminalから以下のコマンドを実行。
Finderから見ると~/test/nasneフォルダがShare1という名で手をつないだ人のアイコンに変わっている。また、サイドバーの共有欄にもnasne-000000が追加されている。
解除は以下のコマンドを実行。
$ umount ~/test/nasne
以上。
ちなみに~/test/nasne をフォルダではなくファイルとして作ると
mount_smbfs: can’t mount on /Users/Shady/test/nasne: Not a directory
とエラーになります。
Visual Studio Codeをスクリプトエディタにする
2016.08.15 23:24追記: 項番5.と項番7.でそれぞれDebugger for Unityをインストールしているのはおかしい、と気づいて確認したところ、項番5.でインストールされるのはver1.01、項番7.でインストールされるのはver1.03でした。そしてver1.03をインストールしていないとブレークポイントをセットしようとすると「error while processing request 'setBreakpoints' (exception: Cannot perform member binding on `null' value) 」なるエラーが発生しました。よって項番5.でインストールしている箇所を削除しました。
ソフトウェアのバージョンアップの為、先人の導入レポートと異なっている所がかなりあったので2016年08月15日に行った記録をまとめました。
環境は以下の通り。
- Mac OS: OS X El Capitan ver 10.11.3
- Unity: 5.3.5f1
- Visual Studio Code: 1.4.0(2016-08-04)
- Mono JIT compiler: 4.2.3
1.Visual Studio Codeのインストール
公式サイト( https://www.visualstudio.com/ja-jp/products/code-vs.aspx ) から VSCode-darwin-stable.zip をダウンロード 解凍すると Visual Studio Code.app ができるので /Applications に移動。
Command + Shift + P キーを同時押しで画面上にコマンドプロンプトを表示、拡張とタイプしてreturnキーを押下すると候補が表示されるので「拡張機能:インストール済みの拡張機能の表示」を選択。「Marketplaceで拡張機能を検索する」とだけ表示されているのを確認し、終了。
2.Unityの外部スクリプトエディタをVisual Studio Codeに変更
UnityのメニューからUnity > Preferences を開きExternal ToolsのExternal Script Editorコンボボックスをクリックし、BrowseからインストールしたVisual Studio Codeを選択する。コンボボックスにCodeと表示されていればOK。
3.テスト用Unityプロジェクト作成
テスト用プロジェクトを下記のフォルダに作る。Shadyは私のユーザー名で深い意味はありません、念のため。
/Users/Shady/Unity/TestVSCodeDebug
とりあえず作成だけで次の工程へ。
4.UnityのProjectにVisual Studio Code用プラグイン導入
DotBunnyさん製のプラグインを使います。 https://github.com/dotBunny/VSCode からD任意のフォルダにダウンロード&展開する。
/Users/Shady/Downloads/VSCode
|
|--HOWTO.pdf
|
|--LICENSE
|
|--Plugins
| |--Editor
| | |--VSCode.cs
|
|--README.md
Pluginsから下を /Users/Shady/Unity/TestVSCodeDebug/Assetsフォルダに コピー。
/Users/Shady/Unity/TestVSCodeDebug/Assets
|
|--Plugins
| |
| |--Editor
| | |
| | |--VSCode.cs
Unityに制御を移すと読み込みダイアログが自動的に開いて作業が反映されます。再起動しなくていいので便利。
5.Unityにプラグイン設定
メニューの Unity > Preferences をクリックすると 左側カテゴリの一番下にVSCodeが出来ているのでこれを選択し、チェックボックスを上から全部ONにします。
さらにInstall Unity Debuggerボタンをクリック。Visual Studio Codeが開き「{0}は正常にインストールされました。有効にするには再起動してください。」と表示されるので今すぐ再起動ボタンを押下します。
Command + Shift + P で 「拡張機能:インストール済みの拡張機能の表示」を実行するとDebugger for Unityが表示される筈です。
確認したらVSCodeを終了。
6.UnityからVSCodeを起動
Unityのメニューの Assets 一番下に Open C# Project In Code が追加されており選択するとVSCodeが起動する事を確認して終了。
7.動作確認用スクリプト作成
Game Object > 3D Object > Cube でキューブを作成 InspectorからAdd ComponentボタンでNew Scriptを選択、LanguageをC#で作成。歯車ボタンの右下にある三角をクリックしてEdit Scriptを選択しVSCodeが立ち上がる事を確認。
「'ms-vscode.csharp'拡張機能のインストールをお勧めします。」 と表示される ので「推薦事項を表示」ボタンをクリック。
表示された拡張機能から「C#」と「Debugger for Unity」の「インストール」ボタンをクリック、しばし待つと「有効」ボタンが表示されるのでクリックすると自動再起動される。
「C#」はキーワードのカラー表示とブレークポイントの設定など、「Debugger for Unity」はデバッグ機能有効化の為のプラグイン。
非常に簡単なスクリプトをば。
public class NewBehaviourScript : MonoBehaviour {

    // Use this for initialization
    void Start () {
        for (int i = 0; i < 5; i++) {
            Debug.Log(i);
        }
    }
8.デバッグ実行
まずVSCode側で待ち受け設定を行う。 VSCode左の虫ボタンをクリックしてデバッグモードに切り替え、Debug.Logの行にブレークポイントを設けた状態で左上のデバッグボタンをクリック。
その状態でUnityの実行ボタンをクリック。
これでブレークポイント上で停止し、変数の内容表示などができるようになる筈。
番外. うまくいかない時は
導入サンプル動画が準備されています。旧いバージョン用で結構違っていますが、流れは掴めると思います。
Marxicoメモ
20151220追記:もしかしてMarxicoで編集したノートはWindowsのEvernoteアプリからは編集できない? 今発見して大慌て...
※はてなブログのmdに対応していない部分はカットしてあります。実際にEvernoteでシェアしたものはこちら
Marxicoって?
Evernoteとの連携
- 双方向バインド(Marxico上で編集した文書はEvernote上のノートに反映され、Evernote上で編集したノートもMarxico文書に反映される)
- @(Evernoteのノート名)[タグ1][タグ2][タグ3]と書く事で直接ノートとタグを設定できる
LaTeX
MathJax ベースらしい(未チェック)。
$$ x = \dfrac{-b \pm \sqrt{b2 - 4ac}}{2a} $$
フローチャート
flowchart.js ベース。
st=>start: 開始
e=>end: 終了
op=>operation: 処理
cond=>condition: 分岐
Yes or No?

st->op->cond
cond(yes)->e
cond(no)->op
1.部品記述 2.(部品ID)=>(部品名): (処理記述) ※処理記述で改行を入れたい時は\nではなくスクリプト内に物理で改行する
シーケンス図
js-sequence-diagrams ベース。
Title: タイトル
主->従者: 通常の矢印
従者-->客: 点線矢印
note right of 従者: 従者のライン右に注記
客->>従者: 開いた矢印
note over 主: 主のライン上に注記
従者-->>主: Dashed open arrow
participant 部外者
- (メッセージ元ライフライン名)(メッセージ種類)(メッセージ先ライフライン名):メッセージ名
- メッセージのやりとりがないライフラインはparticipant (ライフライン名)
- 改行は\n
- 最初(タイトルの次)にparticipant (ライフライン名)を書くことで並び順を入れ替える事ができる
サブスクリプション契約しないとどうなるの
UnityのShaderテンプレートを追加
UnityのShaderテンプレートに頂点シェーダ/フラグメントシェーダ(Vertex/ Fragment Shader)を追加してみた。
位置
うちのMacの場合、スクリプトのテンプレートファイルは以下のフォルダにあった。
/Applications/Unity/Unity.app/Contents/Resources/ScriptTemplates/
テンプレート内容
冒頭のプロパティ部分はオリジナルのまま、処理部分をUnity公式サイトの シェーダー: 頂点およびフラグメントプログラム のサンプルと合成する。
Shader "Custom/#NAME#" {
    Properties {
        _Color ("Color", Color) = (1,1,1,1)
        _MainTex ("Albedo (RGB)", 2D) = "white" {}
        _Glossiness ("Smoothness", Range(0,1)) = 0.5
        _Metallic ("Metallic", Range(0,1)) = 0.0
    }

    SubShader {

        Pass {

            CGPROGRAM

            #pragma vertex vert
            #pragma fragment frag
            #include "UnityCG.cginc"

            struct v2f {
                float4 pos : SV_POSITION;
                fixed3 color : COLOR0;
            };

            v2f vert (appdata_base v)
            {
                v2f o;
                o.pos = mul (UNITY_MATRIX_MVP, v.vertex);
                o.color = v.normal * 0.5 + 0.5;
                return o;
            }

            fixed4 frag (v2f i) : SV_Target
            {
                return fixed4 (i.color, 1);
            }
            ENDCG

        }
    }

    FallBack "Diffuse"
}
ファイル名
保存ファイル名で動きが変わる。試行錯誤して"(ソート用文字列)-(メニュー表示名)-(作られるファイルの名称部分).(作られるファイルの拡張子部分).txt"と分かった。
少しずつ保存名を変えて違いを試す。
A.フォーマット通り
83A-VFShader-NewVFShader.shader.txt
B.拡張子部分なし
83B-VFShader-NewShader.txt
C.メニュー表示名部分なし
83C-VFShaderNewShader.shader.txt

メニュー
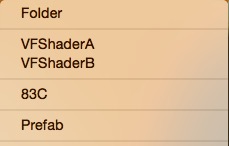
Create時に表示されるコンテキストメニュー。メニュー表示名部分がないのでソート用文字列部分が表示されている。
作成されるファイル

作成されたファイル。上からB(拡張子が付かないのでテキストファイルと同じ扱いになってしまう)、A(表示、動作ともに正解)、C(動作はOKだがファイル名がナニ)
シューティングチュートリアルをUnity5で(第12回)
12.1 Waveの作成
- Import直後はScriptがアタッチされていないので追加されたWaveの各Enemyに手動でEnemyとSpaceshipをアタッチする。
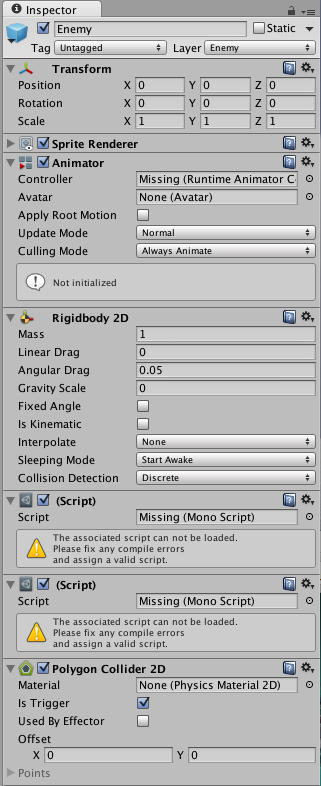
- アタッチしたEnemyにはHpを、SpaceshipにはSpeed、Shot Delay、Can Shot、Bullet、Explosionを設定する(これをしないと敵が出現したきり動かない、弾幕がレーザー、敵が弾を撃ってこない、UnassignedReferenceExceptionなどが起きる)。
| Wave | 1 | 2 | 3 | 4 | 5 |
|---|---|---|---|---|---|
| Can Shot | T | F | T | T | T |
| HP | 10 | 4 | 10 | 10 | 100 |
| Speed | 1 | 1 | 1 | 1 | 0.5 |
- Animatorは追加済みだがControllerが未設定なのでEnemyを設定する(しないとAnimator has not been initializedが出る)。
スコアの表示
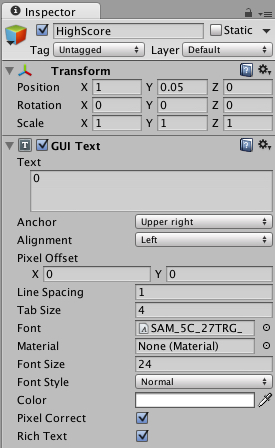
GUITextはHierarchyから作成できないので、CreateEmptyで空GameObjectを二つ作り、それぞれにScoreとHighscoreと名をつけ、Add Component>Rendering>GUITextでチュートリアルと同様の構成を実現する。
HighScoreが表示されないのでTransform.Position.Yを0.05に設定する。
スクリプトの作成
using UnityEngine;
using System.Collections;

public class Score : MonoBehaviour {
    public GUIText scoreGUIText;
    public GUIText highScoreGUIText;
    private int score;
    private int highScore;
    private string highScoreKey = "highScore";

    void Update () {
        if (highScore < score) {
            highScore = score;
        }

        scoreGUIText.text = score.ToString ();
        highScoreGUIText.text = "HighScore : " + highScore.ToString ();
    }

    private void Initialize()
    {
        score = 0;
        highScore = PlayerPrefs.GetInt (highScoreKey, 0);
    }

    public void AddPoint(int point)
    {
        score = score + point;
    }

    public void Save()
    {
        PlayerPrefs.SetInt (highScoreKey, highScore);
        PlayerPrefs.Save ();

        Initialize ();
    }
}
エネミーにポイントを持たせる
- 特記事項なし
using UnityEngine;
using System.Collections;

public class Enemy : MonoBehaviour {
    public int hp = 1;
    public int point = 100;
    Spaceship spaceship;
    private Transform tran;

    void Start () {
        spaceship = GetComponent<Spaceship> ();
        tran = GetComponent<Transform> ();
        Move (tran.up * -1);

        StartCoroutine ("IE");
    }

    IEnumerator IE() {
        if (spaceship.canShot == false) {
            yield break;
        }

        while (true) {
            for (int i = 0; i < tran.childCount; i++) {
                Transform shotPosition = transform.GetChild (i);
                spaceship.Shot (shotPosition);
            }
            yield return new WaitForSeconds (spaceship.shotDelay);
        }
    }

    public void Move(Vector2 direction)
    {
        Rigidbody2D rb2 = GetComponent<Rigidbody2D> ();
        rb2.velocity = direction * spaceship.speed;
    }

    void OnTriggerEnter2D(Collider2D c)
    {
        string layerName = LayerMask.LayerToName (c.gameObject.layer);

        if (layerName != "Bullet(Player)")
            return;

        Transform playerBulletTransform = c.transform.parent;
        Bullet bullet = playerBulletTransform.GetComponent<Bullet> ();
        hp = hp - bullet.power;

        Destroy (c.gameObject);

        if (hp <= 0) {
            FindObjectOfType<Score> ().AddPoint (point);
            spaceship.Explosion ();
            Destroy (gameObject);
        } else {
            spaceship.GetAnimator ().SetTrigger ("Damage");
        }
    }
}
ハイスコアの保存
- 特記事項なし。GameOver時に得点クリア処理が実行されるのでハイスコアを出さないと今回のスコアがわからない。
using UnityEngine;

public class Manager : MonoBehaviour {
    public GameObject player;
    private GameObject title;

    void Start () {
        title = GameObject.Find ("Title");
    }

    void Update () {
        if (IsPlaying () == false && Input.GetKeyDown (KeyCode.X)) {
            GameStart ();
        }
    }

    void GameStart()
    {
        title.SetActive (false);
        Instantiate (player, player.transform.position, player.transform.rotation);
    }

    public void GameOver()
    {
        FindObjectOfType<Score> ().Save ();
        title.SetActive (true);
    }

    public bool IsPlaying()
    {
        return title.activeSelf == false;
    }
}
シューティングチュートリアルをUnity5で(第11回)
この回の操作が最大の難関だった。混乱した時に元に戻せるよう、Gitなどでのバージョン管理を推奨。SceneのSaveだとスクリプトは戻らないので不足。
11.1 HP(ヒットポイント)と攻撃力(power)の実装
- 特記事項なし
using UnityEngine;
using System.Collections;

public class Enemy : MonoBehaviour {
    public int hp = 1;
    Spaceship spaceship;
    private Transform tran;

    void Start () {
        spaceship = GetComponent<Spaceship> ();
        tran = GetComponent<Transform> ();
        Move (tran.up * -1);

        StartCoroutine ("IE");
    }

    IEnumerator IE() {
        if (spaceship.canShot == false) {
            yield break;
        }

        while (true) {
            for (int i = 0; i < tran.childCount; i++) {
                Transform shotPosition = transform.GetChild (i);
                spaceship.Shot (shotPosition);
            }
            yield return new WaitForSeconds (spaceship.shotDelay);
        }
    }

    public void Move(Vector2 direction)
    {
        Rigidbody2D rb2 = GetComponent<Rigidbody2D> ();
        rb2.velocity = direction * spaceship.speed;
    }

    void OnTriggerEnter2D(Collider2D c)
    {
        string layerName = LayerMask.LayerToName (c.gameObject.layer);

        if (layerName != "Bullet(Player)")
            return;

        Destroy (c.gameObject);
        spaceship.Explosion ();
        Destroy (gameObject);
    }
}
- 特記事項なし(チュートリアルだとlifeTImeの初期値が第5回の5から1に変更されているが、これだと敵の弾が空中で消えてしまうので変えない方が良い)
using UnityEngine;
using System.Collections;

public class Bullet : MonoBehaviour {
    public int speed = 10;
    public float lifeTime = 5;
    public int power = 1; //追加箇所
    private Rigidbody2D rb2;

    void Start () {
        rb2 = GetComponent<Rigidbody2D>();
        rb2.velocity = transform.up * speed;
        Destroy (gameObject, lifeTime);
    }
}
ヒットポイントが0になった時に爆発させる
- 特記事項なし
using UnityEngine;
using System.Collections;

public class Enemy : MonoBehaviour {
    public int hp = 1;
    Spaceship spaceship;
    private Transform tran;

    void Start () {
        spaceship = GetComponent<Spaceship> ();
        tran = GetComponent<Transform> ();
        Move (tran.up * -1);

        StartCoroutine ("IE");
    }

    IEnumerator IE() {
        if (spaceship.canShot == false) {
            yield break;
        }

        while (true) {
            for (int i = 0; i < tran.childCount; i++) {
                Transform shotPosition = transform.GetChild (i);
                spaceship.Shot (shotPosition);
            }
            yield return new WaitForSeconds (spaceship.shotDelay);
        }
    }

    public void Move(Vector2 direction)
    {
        Rigidbody2D rb2 = GetComponent<Rigidbody2D> ();
        rb2.velocity = direction * spaceship.speed;
    }

    void OnTriggerEnter2D(Collider2D c)
    {
        string layerName = LayerMask.LayerToName (c.gameObject.layer);

        if (layerName != "Bullet(Player)")
            return;

        Transform playerBulletTransform = c.transform.parent;
        Bullet bullet = playerBulletTransform.GetComponent<Bullet> ();

        hp = hp - bullet.power;

        Destroy (c.gameObject);

        if (hp <= 0) {
            spaceship.Explosion ();
            Destroy (gameObject);
        }
    }
}
アニメーター - レイヤーの作成
まずWindow>Animatorでウィンドウを開く。
レイヤーの追加
レイヤーの追加は右上の+ボタンをクリックする。

レイヤー追加後のWeight設定は右上の歯車ボタンをクリックして別ウィンドウを開く。

Damageアニメーションの作成
レイヤー追加すると初期状態でAny State, Entry, Exitという3つのStateがある。このチュートリアルを行うにあたっては気にしなくて良い。
Damageアニメーションの作成
チュートリアルだとNormalアニメーションが選択されているが代わりにEnemyが選択されていた。
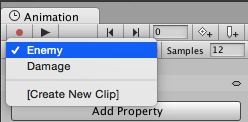
Add CurveボタンはAdd Propertyボタンになっている。

DummyステートからDamageステートへのTransitionをクリックし、表示されたインスペクターのConditionsをDamageへと変更します。
Conditionsは最初空なので+ボタンで新規追加してDamageを追加する事になる。
DummyステートからDamageステートへのTransitionをクリックしてもInspectorにAtomic(タイムチャート)が表示されないことがある。
Atomicが表示されない。
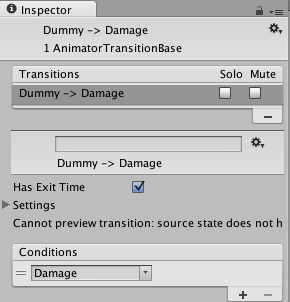
Atomicが表示される。
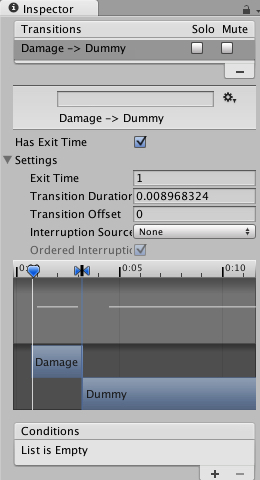
表示されない時は選択しているレイヤーがBase Layerになっていないか確認する。テストの為にゲーム再生をすると、Animatorウィンドウ上では追加したレイヤーのステートマシンが表示されていても、レイヤー一覧上では自動的にBase Layerが選択されるからのようだ。

Atomicはマウスホイール回転で拡大縮小、中ボタンクリックしながら左右移動で表示範囲を移動できる。
シューティングチュートリアルをUnity5で(第10回)
10.1 タイトルの表示
GUITextはGameObjectではなく、Componentになった模様。ゆえにGameObjectからではなくComponent>Rendering>GUI Textで作成する(もしくはInspectorのAdd ComponentからRendering>GUI Text)。
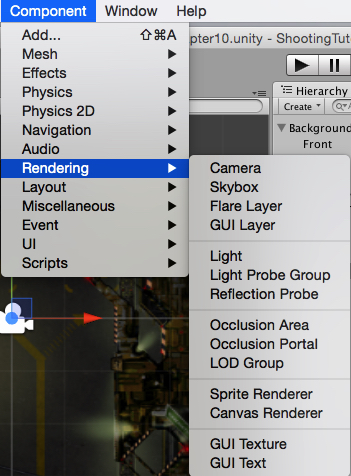
GUI Textコンポーネントは一オブジェクトには複数登録できないので、チュートリアル通りTitleの下に二つのGUI Textコンポーネント、とはいかない。

なので一つのGUI Textに二行テキストを書き、AlignmentをCenter(中央揃え)、Line Spacing(改行高さ)を1.5に設定する事でチュートリアル通りの表示になるようにした。

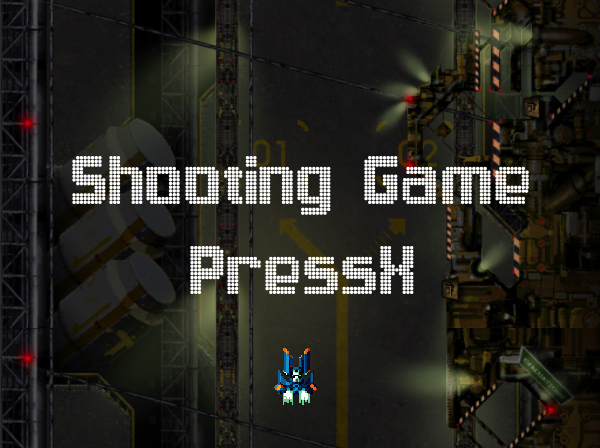
10.2 タイトル -> ゲームスタート ( -> 死んだら ) -> タイトル のマネージャークラスを作る
- 特記事項なし
using UnityEngine;

public class Manager : MonoBehaviour {
    public GameObject player;
    private GameObject title;

    void Start () {
        title = GameObject.Find ("Title");
    }

    void Update () {
        if (IsPlaying () == false && Input.GetKeyDown (KeyCode.X)) {
            GameStart ();
        }
    }

    void GameStart()
    {
        title.SetActive (false);
        Instantiate (player, player.transform.position, player.transform.rotation);
    }

    public void GameOver()
    {
        title.SetActive (true);
    }

    public bool IsPlaying()
    {
        return title.activeSelf == false;
    }
}
- 特記事項なし
using UnityEngine;
using System.Collections;

public class Player : MonoBehaviour {
    Spaceship spaceship;
    private Transform tran;
    private AudioSource audioSource;

    void Start() {
        spaceship = GetComponent<Spaceship>();
        tran = GetComponent<Transform>();
        audioSource = GetComponent<AudioSource> ();
        StartCoroutine("IE");
    }

    IEnumerator IE()
    {
        while (true) {
            spaceship.Shot(tran);
            audioSource.Play ();
            yield return new WaitForSeconds(spaceship.shotDelay);
        }
    }

    void Update () {
        float x = Input.GetAxisRaw("Horizontal");
        float y = Input.GetAxisRaw("Vertical");
        Vector2 direction = new Vector2(x, y).normalized;
        Move(direction);
    }

    void Move(Vector2 direction) {
        Vector2 min = Camera.main.ViewportToWorldPoint (new Vector2 (0, 0));
        Vector2 max = Camera.main.ViewportToWorldPoint (new Vector2 (1, 1));
        Vector2 pos = transform.position;

        pos += direction * spaceship.speed * Time.deltaTime;

        pos.x = Mathf.Clamp (pos.x, min.x, max.x);
        pos.y = Mathf.Clamp (pos.y, min.y, max.y);

        transform.position = pos;
    }

    void OnTriggerEnter2D(Collider2D c)
    {
        string layerName = LayerMask.LayerToName(c.gameObject.layer);
        if (layerName == "Bullet(Enemy)") {
            Destroy (c.gameObject);
        }

        if (layerName == "Bullet(Enemy)" || layerName == "Enemy") {
            FindObjectOfType<Manager> ().GameOver (); //追加箇所
            spaceship.Explosion ();
            Destroy (gameObject);
        }
    }
}
- 特記事項なし
using UnityEngine;
using System.Collections;

public class Emitter : MonoBehaviour {
    public GameObject[] waves;
    private int currentWave;
    private Manager manager;

    void Start () {
        manager = FindObjectOfType<Manager> ();
        StartCoroutine ("IE");
    }

    IEnumerator IE() {
        while (true) {
            while (manager.IsPlaying () == false) {
                yield return new WaitForEndOfFrame ();
            }

            GameObject g = (GameObject)Instantiate (waves [currentWave], transform.position, Quaternion.identity);

            g.transform.parent = transform;

            while (g.transform.childCount != 0) {
                yield return new WaitForEndOfFrame ();
            }

            Destroy (g);

            if (waves.Length <= ++currentWave) {
                currentWave = 0;
            }
        }

    }
}